Ever wanted to experiment with the ZAP codebase but felt intimidated by it? This guide will walk you through the process of building ZAP from the command line regardless of your operating system or IDE.
You can also follow along with Simon Bennetts as he sets the ZAP development environment in this Deep Dive video:
NOTE: This video was created prior to the introduction of mandatory add-ons in ZAP. For an up-to-date guide on building ZAP from source, please refer to the text below the video.
Let’s jump right into it!
Preparation
All you need is a working local installation of git and JDK 17.
Clone the Repo Locally
Create a new directory on your system and run the following commands in that directory to clone the main ZAP repositories.
git clone https://github.com/zaproxy/zaproxy.git
git clone https://github.com/zaproxy/zap-extensions.git
Installing ZAP Add-ons
As the name suggests, ZAP add-ons are a way to enhance ZAP functionality. There are several add-ons that allow you to do many different things. Some add-ons which are required by ZAP to work properly are called mandatory add-ons. These add-ons need to be installed first to be able to run ZAP from source.
The zap-extensions repository contains the source code for the add-ons maintained by the core team, including the mandatory add-ons.
ZAP uses the Gradle Wrapper that downloads all the dependencies for the projects.
Navigate to the zap-extensions folder that you cloned earlier, and run (replace ./gradlew with gradlew.bat if you are a Windows user)
./gradlew tasks
to see a list of the available tasks. You can see many tasks in the output, but this is the one we’re interested in:
copyMandatoryAddOns - Copies the mandatory add-ons to zaproxy project.
./gradlew copyMandatoryAddOns
For this command to work as expected, you need to have your local clones of zaproxy and zap-extensions in the same directory. If you run this command while ZAP is running, you must restart ZAP to see the newer add-ons.
You can also install other add-ons with the task
copyZapAddOn - Copies the add-on to zaproxy project (defaults to "$rootDir/../zaproxy/zap/src/main/dist/plugin/").
./gradlew copyZapAddOn
Note that this task installs ALL the ZAP add-ons in zap-extensions. To install a specific add-on, run the following command
./gradlew addOns:IDENTIFIER:copyZapAddOn
where IDENTIFIER is the name of the add-on you want to install. You can find the identifier by looking at the structure of the zap-extensions repository:
├── zap-extensions
	├── addOns
	│   ├── accessControl
	│   ├── alertFilters
	│   ├── alertReport
	│   ├── allinonenotes
	│   ├── amf
	│   ├── ascanrules
So, for instance, if you want to install the Release status Active and Passive scan rules, you would run:
./gradlew addOns:ascanrules:copyZapAddOn
./gradlew addOns:pscanrules:copyZapAddOn
or if you’re in a hurry,
./gradlew aO:ascanrules:cZAO
./gradlew aO:pscanrules:cZAO
The process of installing the ZAP HUD and the help is identical:
- Clone their repositories in the same folder as the other two.
git clone https://github.com/zaproxy/zap-hud.git git clone https://github.com/zaproxy/zap-core-help.git - Navigate to the cloned folders and run
./gradlew copyZapAddOn
Another useful task you will find when you run ./gradlew tasks in the zaproxy folder is:
copyWeeklyAddOns - Copies the weekly add-ons into plugin dir, built from local repos.
./gradlew copyWeeklyAddOns
In essence, this task is the same as running ./gradlew copyZapAddOn for each of the add-ons included in the weekly release (see zaproxy/zap/src/main/weekly-add-ons.json).
For a better understanding of Gradle tasks you can check out the Gradle user manual.
Running ZAP from Source
Ensuring that the mandatory add-ons are installed, navigate to the cloned zaproxy folder and run the following command:
./gradlew run
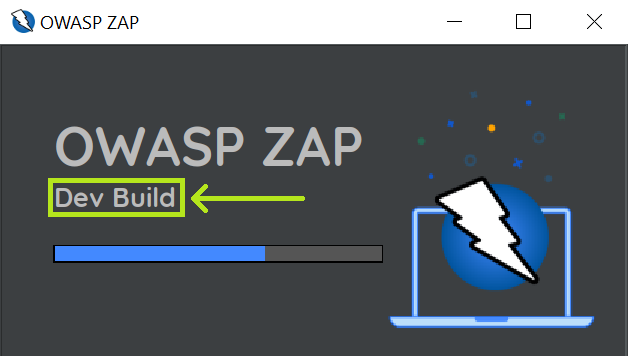
That’s it! You’re now running ZAP from source! You can confirm this if you see “Dev Build” in the loading window.
If you didn’t install the mandatory add-ons an error will be shown:
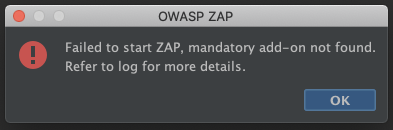
The output/log will show a message like:
[ZAP-BootstrapGUI] ERROR org.parosproxy.paros.control.Control - The mandatory add-on was not found: callhome
It is possible that you might be greeted with the following prompt if you already have some other application that is using port 8080.
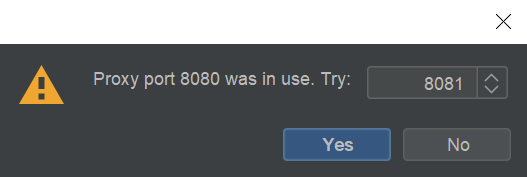
In this case, ZAP suggests a different port that is free and starts listening on that port when you click on Yes.
For Prospective ZAP Contributors
If you feel that some part of ZAP can be improved, enhanced or updated in any way, go ahead and open a pull request! Here are the steps you need to follow before you can do that:
- Clone the main repositories as illustrated above.
- Create a GitHub account.
- Fork the ZAP repositories.
- Update the tracked (remote) repositories.
- Make changes and submit a PR!
Fork the Repos on GitHub
Go to the GitHub page of each repository you cloned and fork it to your account (the button is towards the top right of the screen).

- https://github.com/zaproxy/zaproxy
- https://github.com/zaproxy/zap-extensions
- https://github.com/zaproxy/zap-hud
- https://github.com/zaproxy/zap-core-help
Update your Remotes
Next, update the remotes for the repositories you cloned on your system.
- Navigate to the cloned repository.
- Point the remote origin to your repository.
- Add and point the remote upstream to the main repository.
Here are the commands for two repositories; the procedure for others is identical. Replace USERNAME with your GitHub username.
cd zaproxy
git remote set-url origin https://github.com/USERNAME/zaproxy.git
git remote add upstream https://github.com/zaproxy/zaproxy.git
cd ..

cd zap-extensions
git remote set-url origin https://github.com/USERNAME/zap-extensions.git
git remote add upstream https://github.com/zaproxy/zap-extensions.git
cd ..
Make Changes and Submit a PR!
We welcome any changes made by a Contributor following a review process. Prior to submission of a PR, please be aware: Contributions must adhere to the Guidelines.
If you have any questions related to ZAP development, reach out on the ZAP Developer group or the IRC channel.